HOW TO MAKE AN ELEGANT CLERGY STOLE
So... you want to make a clergy stole. Hey, that is wonderful (read to the bottom to get my free pattern)! Whether you are making a stole for yourself or for someone else, it will be a fun project, indeed. But before you get started, let's talk a little about symbolism and colors. In the Christian church, the clergy stole is a symbol of ordination and the colors normally follow the Christian year. There are five colors that are traditionally used with a couple choices for the Advent Season (blue, purple, white, green, red & sometimes gold instead of or in combination with white). And of course, there are many designs to choose from. For example one white stole may have the symbols of Holy Communion, another the symbols or Baptism, and others may be designed for Trinity Sunday, Christ the King Sunday or Christmas, etc. But all will be worn in accordance with the Christian Year:
Advent (Blue or Purple)
Christmas thru Epiphany (White/Gold)
Sundays after Epiphany (Green)
Transfiguration (White/Gold)
Lent (Purple)
Easter (White/Gold)
Pentecost (Red)
Trinity (White/Gold)
Sundays after Pentecost (Green)
If you are creating a stole for a newly ordained clergy person, what a blessing your gift will be for them. When I first started out as an ordained elder I realized very quickly that five stoles (one for each season of the Christian year + a communion/baptismal stole) were going to be expensive. Considering that the average cost of most quality hand-made clergy stoles is around $300, that can prove to be a financial burden on most newly ordained ministers.
Let me suggest that you make a red stole for Pentecost (they may also wear it at their ordination service) or a white stole for communion and/or baptism. Or possibly a green stole would be a nice choice too, because green is the color that is worn most during the year.
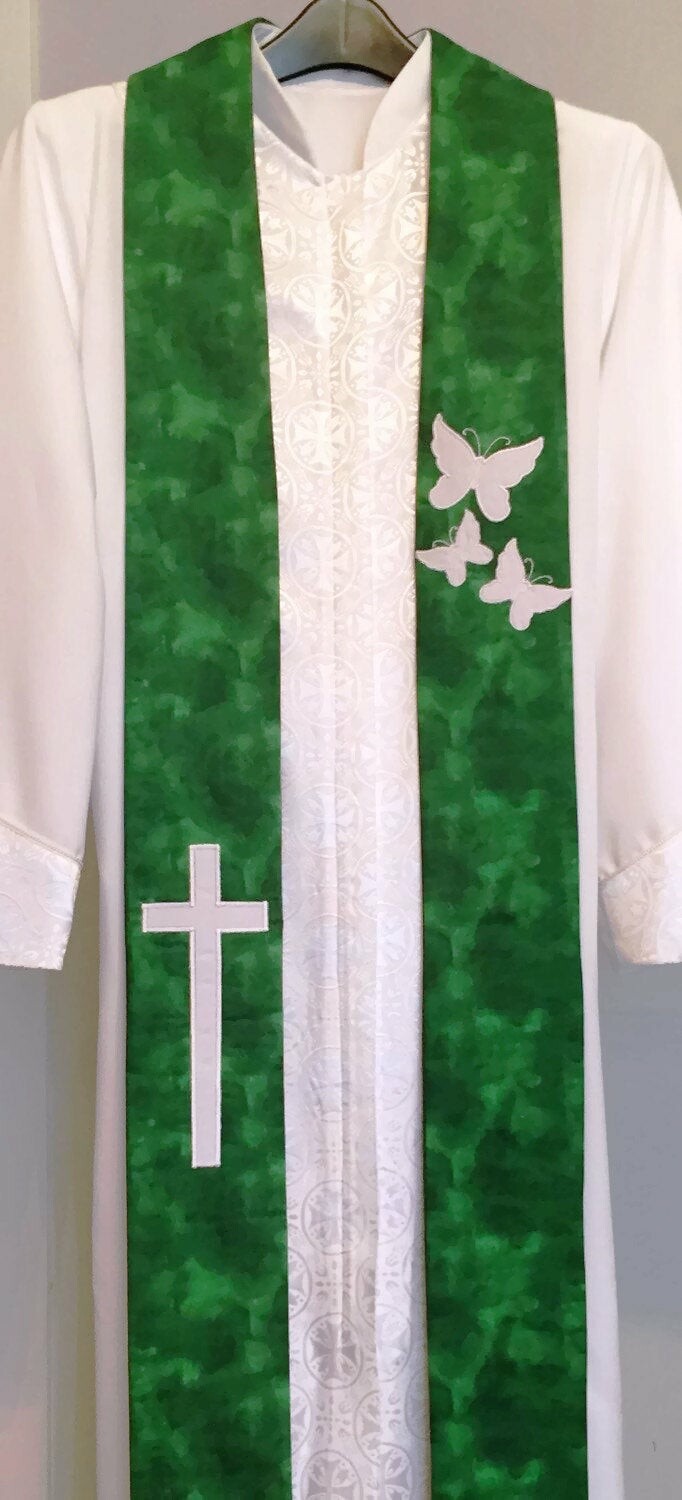
 Once you decide what color your stole will be, then you will need to pick out the fabric. I like to choose a fabric that is not too busy, but also has a small design. The fabric in my Three Butterflies stole will give you a good example. I use a 100% cotton fabric for the front of the stole and a cotton/polyester blend (solid color) for the back. And my best choice for the applique fabric would be a thicker satin fabric. The three butterflies symbolize the Trinity and the Cross points to salvation. I think that this design is also very elegant in purple.
 You will also need a lining fabric to give your stole a nice drape. My favorite lining is a fusible fleece Pellon, which can be found online or in most fabric stores. It looks like a light quilting fabric, but is fusible on one side. In making this stole I used an embroidery machine, a sewing machine and a serger. Plus don't forget the thread. I used a polyester embroidery thread (white) for the designs and a coned serger thread (green) to sew the stole together. And after turning the stole right-side out, I hand stitched the bottoms of both sides with a green embroidery thread and steam pressed it to give it that final touch.
Okay, one thing we have not covered yet, is the pattern. Where do you find the pattern. Well, if you have another clergy stole that you like, you could simply sketch the pattern onto a pattern making fabric (and cut it out) or you could search online for a pattern that you may purchase. There are several different stole patterns to choose from, but my favorite, is the one that has a gentle curve at the top (the rounded pattern design). And, of course, you will also need a cutting board/table and a Rotary cutter (with a round razor sharp blade) or a nice pair of scissors, such as Gingers. Okay, are you ready to begin your stole?
Here's a video that you may find helpful:
Stole Construction
Step 1: If you are going to embroider or applique a design on your stole, do that first.
Step 2: Cut the stole front out using the paper pattern, centering your design properly
Step 3: Cut the lining & the stole back out using the same paper pattern
Step 4: Fuse the Pellon fabric to the back-side of the stole front
Step 5: With right sides facing, serge the center back of the stole front & the center back of the stole back (1/2" seam)
Step 6: Press the serged seams to one side with the iron
Step 7: Lay the stole front right-side-up on the cutting board & pin the stole back right-side-down on top of the front (the right sides of the front & back should be facing)
Step 8: Starting at the bottom, serge the outside edge all the way around & then serge the inside edge in the same manner (1/2" seam)
Step 9: Turn the sewn stole right-side-out and press with an iron
Step 10: Press a hem in both sides of the stole (measuring carefully to make the sides even)
Step 11: Hand stitch the hems closed and re-press the stole
Congratulations! You have completed your stole. I know that you will be blessed in the journey and, if it is a gift, that the recipient will be double blessed, as well.
To receive my free Rounded
Clergy Stole Pattern!
Clergy Stole Pattern!

Christian Women Empowerment


Darlene
If you’re feeling adventurous, why not make your own? You can use my free pattern to create a stunning clergy stole for your granddaughter. It's designed to be beginner-friendly and can be a meaningful and cost-effective project. Just click the button in this post to get the free pattern. I'm confident that with a little practice, you'll create something wonderful! Plus inside our Sewing & Knitting Hub there is a Community Chat where you can ask questions and get support along the way.
Happy sewing!
~ Paula ✝️